Showing posts with label Brisbane college of photography. Show all posts

Saturday, 21 January 2012

Colour Level 1: Weeks 7 and 8

In week 7 we discussed more of the same topics.

Tonal value for exposure - run a bracket if you need to - he emphasised again how important 'getting it right in the camera' was. For a red car, you need to overexpose by 1 stop to get the exposure right.  For bright yellows, it's +1.5, and for rich blacks, underexpose by 2 stops.

Some suggestions for macro - use a tripod, mirror lockup and a remote release, and the smallest aperture you can on your lens. Important to remember that DOF reduces with short lens-to-subject distance.

Environmental portraiture - your background should match yoru subject, eg the photo below by Arnold Newman shows a portrait of a pianist. Strong lines, the figure is barely there, but he is obviously a pianist! A google images search of his work comes up with many great environmental portraits.
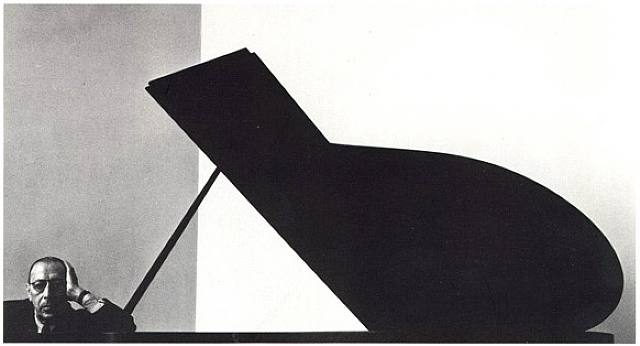

He also suggested trying to use lighting to emphasise character of a person.

We went down to the studio to shoot some window light portraits. The three below show how important it is to meter (partial or spot) off the lit side of the face.
Photo 1: Metering off whole face


Photo 2: Partial metering off lit side of face


Photo 3: Partial metering off lit side of face, reflector held on other side to even lighting somewhat


They do look slightly underexposed to me, but the message is clear to be careful about how you meter - important to control the highlights on your subject (apart from catchlights etc which are only spot points). Obviously a dedicated light on the background would improve these images.

Week 8 is the final week and we reviewed some topics we had covered before.

More macro and landscape suggestions by way of a short video (Tony Sweet). Warm and cool tonalities look good together. Line up to be parallel with subject (for DOF), and look for patterns. For sunrise landscapes (shooting into the sun for example), use a polariser. Important to bracket with landscapes.

We also discussed our final assignment, which was 'movement'. I include my photos below. It was interesting to see the variety of shooting styles and experience of the group, which was quite varied.

Photo 1: Girl at Roma St Bus Station.


Photo 2: Small child learns to fly. Rear curtain flash.


Photo 3: Shower showing movement of water frozen.


Photo 4: The steering wheel goes round and round.


Photo 5: Zooming during the photo to give a sense of movement


Photo 6: Moving the camera whilst photographing the Christmas lights on a neighbours house


I have enjoyed this course and got lots of good tips and tricks and definitely feel more confident with my flash, which was one of the main reasons I did the course in the first place. I'm not sure if I'll do another course, I was a bit disappointed that there was not much chat amongst the group, perhaps that is unusual. I also wanted to meet some other keen photographers here in Brisbane. Nonetheless, it was a fun and worthwhile experience to do this short course.


Friday, 25 November 2011

Colour Level 1: Week 6

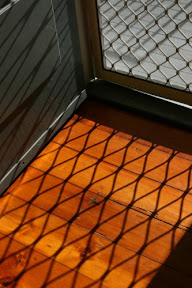
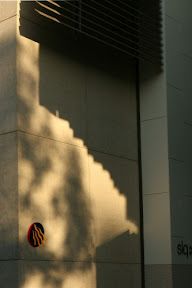
Week 6 saw the review of Assignment 2, Shadows and Shapes. The main brief was to capture interesting shadows and the key point here was to 'control the highlights'. I didn't feel particularly inspired about this exercise, it seemed lacking in reason, though perhaps it was a good exercise. I thought it was going to be about how we could use objects to manipulate light possibly for transfer of skills into the studio setting, but it was more about exposure. Nonetheless, it's always good to practice skills of looking and then taking the photos.

A couple of the photos were taken in very familiar environments (home/commute), and though I had admired the patterns before I hadn't captured them, so it was nice to do so. It was good to see other students efforts, one girl had done a lot of 'posed' situations, some of which were quite dramatic.

Photo 1: View into our neighbours yard.


Photo 2: Front door patterns.


Photo 3: State Library lit by late afternoon sunlight.


Photo 4: Tree on a sidewalk making a nice pattern on the ground.


Photo 5: Walk through Mt Coot-tha Gardens.


Photo 6: Bike shadow, taken on my ride to work.


The rest of class this week was spent discussing flash a bit more (answering questions, and having some more practice, with Manual settings, in the studio downstairs), and some advice on metering, and use of filters such as polariser and graduated neutral density filters.

Thursday, 17 November 2011

Colour Level 1: Week 5

This week we started by reviewing the first assignment (the views over the city with ambient and artificial light). Everyone's projects were similar, the changes in colour of the sky through the series was interesting to see repeated in everyone's images. One enthusiastic student had photographed 4 separate views (on 4 nights) which was an impressive effort. I thought Steve did a good job of praising everyone's photographs, and giving suggestions to how we could all improve.

We next started with the hands on use of our speedlight flashes. We again discussed the formula used to select the correct distance your flash needs to be from your subject assuming it is either off the camera or in Manual mode.

D = GN/F

The importance of knowing your _real_ guide number of your flash is important here. I have a 580EX so have attemped a guide number test but came out with something around 44 or so, but did find the whole exercise pretty subjective, so am looking online. Supposedly Canon say the guide no. is 58 but this is unlikely to be true. From this site, it seems like the guide no. at ISO 100, 50mm is 43, which is very close to the 44 that my guide no. test came out with. We are discussing this more next week at class.

We then discussed what white balance to use when using flash. When sources of light are mixed, we need to use the 'dominant' light source. In a room of fluro lights, it seemed that we should use fluro as our setting, but this gives a very strong blue cast to the photos, so we need to use flash (or manual K=6000) as our white balance to give a more accurate colour. We could even use K=6200 to slightly warm the image.

We tried taking some photos, and found that with ETTL in the small room the flash was too strong. We needed to go down to -2 or -3 stops Flash Exposure Compensation (FEC) in order to produce a photo which didn't look obviously 'flashed'.

Then we briefly went downstairs to the studio to take some more photos, some of which I include below as test shots. The first is using the flash pointing straight at the subject, with FEC = 0. A reasonable image, but flash is obviously used.


The second is with the flash still pointing at the subject, with FEC = -1. Here the flash is less obvious, and it is a better photograph.


The third image I'm showing here is a pseudo window lit portrait, created by flashing the subject via the wall - with the flash head pointing at an angle to the wall to throw the light on the subject on the side. This adds some nice shadows on his face, and though is a little obvious in this image, is an improved and more interesting photo than the previous ones.


It was great to get into the flash and immediately I feel more confident about using flash more in my photography.

Thursday, 10 November 2011

Colour Level 1: Weeks 3 and 4

Week 3 mostly covered 'What is light?'

We discussed colour temperature for the whole evening, and it was good to chat more about something which I had a basic understanding of before, but had always struggled a little with. I used to shoot using daylight WB (White Balance) and hope that the photo worked out OK! Lately I have been using RAW conversion (I have taken RAW files for years but not used them much) and have found a better workflow which involves me doing some simple post processing in the RAW converter to get a better image and also to fix up the WB which can make a surprisingly big difference to an image!

The discussions in class focussed on the idea of 'get it right in camera' and thus suggest using the K setting (for Kelvin) on the WB selection to tweak the WB in the jpg out of the camera and thus decrease the need for fiddling with raw files. It also improves your knowledge and understanding of how to better use Kelvin (ie to warm up an image or cool it down).

Likewise, the tutor Steve suggests we use total Manual on our SLRs. I generally shoot in either Av or Tv so it is a change to shoot in M. You have to think a bit more but the idea is that we will become better photographers in the process. I do like this thinking and it does require more time & effort which would probably also be good for me...

The diagram below shows the Colour temperature scale, with low numbers representing warm colours (candle etc) and high numbers representing cool colours (eg the deep shade of a building).

The Kelvin scale shows the full range of the color spectrum.
Taken from this site.

This week (4) we discussed Flash. 

Next week will be practical use of flash, so there was a lot of talking tonight, but I found it very useful. We discussed which mode to use (camera and flash) when using an external flash:

Av + TTL: Not a good idea as the shutter speed might go above the sync speed.
Tv + TTL: Better, however this method will mean no choice of DOF and thus less creative control
M + TTL: This is the gold standard. Total control - you set the shutter speed (usually around the sync speed of the camera, mine is 1/250), and then choose the aperture for the DOF you wish to have for your subject. The TTL will fill in the rest.

We discussed using Flash Exposure Compensation (FEC) which usually requires the flash to be turned down 1 to 2 stops if it is being used as fill flash. Another way is to use a diffuser, either the built in one on the flash head, or a Stofen, or a Gary Fong like I have (though have found to be a big bulky some of the time). We also discussed using other methods such as pointing the flash at a ceiling or wall (if it is white and close by) and this will also both diffuse the light and decrease the power.

Then we got into the formulas and discussed guide numbers and how to calculate it for your flash (which I will get onto soon). And then just using the simple formula:

GN = F/D
ie. Guide No. = Fstop/Distance

So decide what your choice is - either you have a specific fstop in mind or you are limited by distance, and then just use the formula to work out what the other variable should be. Don't forget if you shoot off a ceiling or wall these also are included in the distance (ie it's total distance from your Flash to your Subject). That also means that you can set your flash up and then know you can move around your subject as necessary (assuming flash in one place). This was super useful for me so I'm hoping to get some time on the weekend to play with my flash a bit more.

We finished up the evening talking about studio lights and what sort of different things you can stick on the end (soft boxes, spill dishes, snoots etc). A very informative evening all up!

A quick example below of my first experiments using second curtain flash and slow sync.
f/5.6, 1/4s, on camera flash, ISO 100

Learning to fly

Tuesday, 1 November 2011

Colour Level 1, Assignment 1

Assignment 1 for Colour Level 1 looks at the relationship between ambient light and artificial light, ideally in the situation of sunset with the sun behind the camera. I had to make two attempts at this because the first attempt turned out to be an unsuitable sunset (totally cloudy) so I left half way through sunset. We were advised to start shooting 20 minutes before sunset, and photograph roughly every 2 minutes, and finish shooting 20 minutes after sunset. We were to keep aperture constant (f/11) and use ISO 100 setting, obviously using a tripod and preferably a cable release. I enjoyed this exercise. I don't get a whole lot of time for photography, most of it is slipped in between toddler naps and outings etc. So this was an hour to myself to go and take a set of photographs which I am fairly happy with.

I thought carefully about the scene, and chose to photograph a pedestrian bridge over the Brisbane river with the city in the background and the nice curving bridge leading the eye through the image. To get this I positioned myself on the William Jolly Bridge which is a lovely viewpoint over the city of Brisbane. The progression of light changes over a 40 minute period is fascinating. I managed to just capture the last light on the buildings, then just prior to sunset there is a certain grey feeling (fortunately a few boats went past at this time to maintain interest). Then as sunset arrives there is little change apart from shutter speeds getting longer and lights starting to come on first on the bridge, and then illuminated signs on the buildings start turning on. As the time after sunset increases the sky turns a beautiful deep blue and the ambient light becomes more obvious and fills parts of the frame with a lovely warmth.

Below are a dozen photographs of my chosen scene.


5:54pm

6:00pm

6:05pm

6:12pm

6:24pm

6:25pm

6:28pm

6:30pm

6:31pm (note f/19)


6:33pm


6:37 (note f/22)


6:39pm


I like the effect enforced by the smallest aperture images - due to the longer shutter speeds the water has a smoother quality than the other photographs. However the building signs are somewhat burnt and blurred in these longer shutter speed images. The progression of light is lovely and I think well captured in this set of photos. Sunset was at 6:04pm and I note that only two of the twelve best photos were taken before this time - so waiting for the golden hour after sunset definitely appears true in this situation.


Thursday, 27 October 2011

Colour level 1

I have enrolled in a short photography course based at the Brisbane College of Photography, entitled Colour Level 1. I wanted to get to grips with my flash mostly, having had some challenges using it in anything other than automatic, and thought that this course, conveniently located a 10min cycle from home, would assist me. If I enjoy it I may go back for more advanced modules.

The second class (the first I could attend) was interesting. I obviously have picked up quite a bit of photographic knowledge in the last few years as I was one of the more knowledgeable (or at least more vocal!) in the class, able to answer many questions. It consolidated a few points for me though, and I thought I would use this blog to continue my photographic learning documentation, and I'll post my assignment work here too.

We covered many points without going into too much detail:


  • Slow sync + rear curtain flash - suggested for use with children (I will try this out with my little one)
  • BULB - when to use and how to calculate exposures (its all mathematics, you just need a known quantity and you can determine your shutter open time from there)
  • Partial metering might be a better option than centre weighted or spot
  • Talked about the dynamic range that a camera can cope with (5 to 6 stops), and what we can do to limit the dynamic range in a photograph (use fill flash, use a graduated neutral density filter or use a reflector to light dark areas).
  • Controlling the highlights is the most important thing (not possible to get back later)


We chatted about lots of other things too. I'm looking forward to next weeks class, and have an assignment to complete in the mean time. As much as I enjoy studying with the OCA I like the idea of attending a class and talking photography with other students face to face (particularly since I'm on the other side of the world to most OCA students!)